Day 27: How To Build A Website With Squarespace in 20 Minutes
FREE 30 Day Course
Squarespace is known as a content management system just like WordPress and Shopify. In my opinion, Squarespace is great for beginners because it makes really nice-looking websites without needing to be a programmer. No matter what type of website your online business needs, Squarespace can help you build it.
Set the timer for 20 minutes and let’s go!
I will preface this by saying that being an entrepreneur is all about being scrappy. After 20 minutes is my website going to look the best that it possibly could? Probably not. But, especially during the beginner stages of a side hustle, you don't need to worry about all of the little details being perfect. After you start gaining customers, you can begin to take the time to improve and optimize your site.
Setup

To begin, go to squarespace.com and click Get Started. You will then be prompted to enter some information about your website regarding your goals and progress so Squarespace can recommend templates.
Browse the templates that pop up and preview ones that you are interested in. Once you're set on a design, click Start With This Design in the upper right corner.
Next, enter the name of your website and you're ready to start customizing.
Home Page
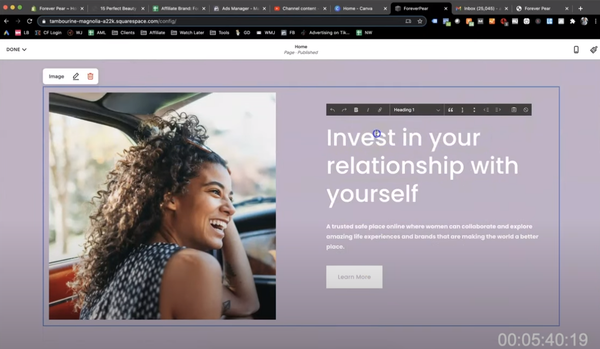
To customize your home page, click the Edit button in the top left. First, change your headline to something inviting has to do with your brand. A description can be added below it. Continue to fill each section with text that makes sense for your homepage. It is typical to have a header, a section that describes your brand, and a CTA or opt-in offer. Optional sections include a quote, testimonials, brands you've worked with, social media plugs, etc.

Don't forget to change the default pictures! Squarespace offers a vast library of free, quality stock photos that you can use. There’s no need to take your own photos or hire someone to take them for you; Squarespace has it covered!
Tip: Always preview what your website will look like on a mobile screen. 50% of traffic is mobile these days so you want to make sure your website looks professional no matter what device a customer is viewing it on.
Once you are finished, click Done and Save to save your changes.
About Page

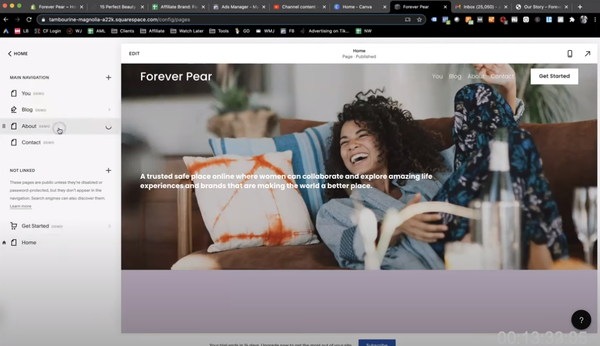
To create a new page, select Pages on the left-hand side of the screen. Create an About page (if your template hasn’t done so already) and hit Edit. Once again, fill in the header with a phrase like “Our Story” or “About”. Change any default images to ones that fit your brand. Lastly, create a story that tells readers who you are. This description should be well thought out and genuine.
Blog
A blog is a must-have page for every website. To create this page, follow the same steps listed above. Your blog will help with organic reach and shows other brands that you are legit. To create a new post, click the plus sign, the edit button, and then begin typing or copy and paste a pre-written post in. You should have at least 3 blog posts up when you launch.

The paintbrush icon in the top right corner will allow you to change your post settings. You should always add an image and fill out the SEO description for your post. These factors will help your post rank. Your SEO title should be under 60 characters. You should also enter a description that is around 200 characters and includes terms that somebody who may be interested in your post would search for.
Contact Form
Finally, you need a contact form. A contact page is necessary so that brands and partners can reach out and offer to work with you! I would not recommend putting your personal phone number or email on the internet. Instead, create separate lines of communication that won’t bombard your personal inbox but will still be reachable.
Before publishing, preview your website. If everything looks good, go ahead and launch! It’s really that easy!
Is Squarespace for you? I do have two other videos in this course on building websites from scratch that you are more than welcome to check out. One is over using Shopify and the other is about using WordPress. Let me know which one you're going to use!
Thanks for reading.
Peace.
For the complimentary worksheets and resources, go to adrianbrambila.com/30days.
I make new content every single week, so be sure to subscribe to my Youtube and follow my Instagram @brambilabong and TikTok at @AdrianBrambila. I also have tons of resources and courses on my website that you won’t want to miss. Head over to www.adrianbrambila.com to learn more about what I do and how I live a financially free life.
1 comment
Hello, I am currently completing one of your courses that my Husband signed up to. However some of the content appears to be “locked” and I cannot access them. Please can you advise on how I can get into them as my Husband paid for the course. I look forward to hearing from you. Kind regards,
Kate & Marcus Hattersley